Showing posts with label hardscapes. Show all posts

Monday, January 25, 2021

Watching the Water Flow

Living in on a sloped lot often brings a lot of challenges. I have already diverted water flow in a few areas. The dry creek bed in the back yard was the first, you can read about it here. I did not do that one, bigger task than I knew I could handle. 
The second was in our front yard, done with my daughter Rachel's help. You will see the change in the front yard in this post done July, 2019. Since then there was a mulch change from being hardwood mulch to pine straw. The pine straw has stayed put but needs to be refreshed. Unfortunately the dry creek bed that Rachel and I put in was in bad shape. Below photo is from the bottom of the hill, soil washed downhill into the rocks and there are winter weeds galore- no clear path for the water flow.


 I hated how bad this looked and decided it was time to fix it. Doing work like this in the winter is good because it isn't so hot, but my lovely assistant isn't visiting now. I paced myself. I looked at the overall job and put it into many days of small tasks. 

Task one- get the existing rocks out. I had some help from Liebling. She likes to sit in front of where ever you are wanting to work. 


Working on the hillside with it wet under foot isn't for sissies. My plan was to put a blue tarp down along the side of the garden area and toss the rocks to it. I decided that the larger, bowling ball sized (and up) would stay in place to keep me on track that the trench didn't move off track.


After removing all the rocks the second task was to dig out the weeds, soil, and a few plants. Again I remind you that the yard was wet and the slope is steep. I lost count of how many wheelbarrow loads I did. I just dumped them into the edge of yard, under the blue cypresses. There is a sharp drop off from the grass to under the cypress. Wanting to finish, I over loaded a few times. I had one spill out of wet clay soil into the grass- what fun. 


As you see below, wider and deeper. 


As I was digging it looked like I was digging deeper in the top part of the creek and wanted to make sure the downhill slope was consistent through the course. From the top of the creek to the bottom of the creek was about three feet difference in a run of about fifteen feet. I got out the level, some string and a couple of bamboo stakes and kept myself true to the slope.


Once I was finally satisfied with the trench, it was time for the next step- landscape fabric. Thinking that I still had some in the garage from my flagstone patio installation I moved forward. You know what was next, right? Yes, an online order to Lowe's and a curbside pickup. I was working against a clock, there was rain in the forecast and I didn't want a bigger muddy mess than I already had. 


Using the larger rocks to hold the fabric in place I got to work. Tossing the small rocks back into place wasn't going as smoothly as removing them. I got out my Gorilla Tub, a Fling swag staple in my garden.  Filling the tub and bringing them six feet to the fabric doesn't seem like hard work, but after an hour or so of bending, loading, unloading, bending to place all took a toll on my back!!


Little by little, the rocks were placed in the trench, covering the fabric along the way. 


Since the new trench was wider and deeper, the existing rocks did not cover all the fabric. I have more rocks, a good deal more. Where might these rocks be? Why, they are in the backyard, at the bottom of the hill, in the woods.  Under the leaves, next to the tree, is a pile of rocks about five feet in diameter and almost a foot deep. 


Long story short, I made eight trips over two days walking a tub half filled with rocks back up the hill.  A little tweaking of the sides of the soil near the top of run made the slope a little less severe so the rocks could stack against the sides. Hand placing all the new rocks, filling in bare spots was another task that was harder as I progressed. Finally! All done! 

 View from the top- 


View from the bottom, next task will be to get some more pine straw bales and spread them.


A side by side before and after. Boy, I am glad that is done. Well, done is relative- will wait for a big rain to see how it functions. Another tweak or two might be needed, but not hauling rocks uphill for a while!

Time to rest! 
Stay tuned for more bee posts.


©Copyright 2021 Janet. All rights reserved. Content created by Janet for The Queen of Seaford. words and photos by Janet,The Queen of Seaford.

Tuesday, November 7, 2017

Try, Try, and Try Again- Don't Do as I Do!


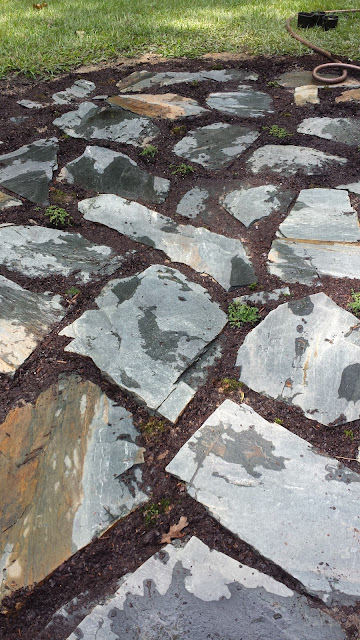
Do you have spots in your yard where grass doesn't grow well? A spot that stays a bit soggy in the winter?  We have such a spot next to the driveway near the garage. My desire to have a sitting space in this part of the yard led us to decide to put in a rustic flagstone patio. Step one- dig out the area to give room for the flagstones to be level with the surrounding yard. We also put down a weed barrier, pinned down with some long nails.  


Step two- have the flagstones ready to place... sort of a dry fit.


Step three- sand to level the area and give the stones a base for nestling in.

Step four- place the uneven natural stones in a pattern to form the patio.


Hmm, too much space between the stones, move them closer.


Step back and access the work.


Step five- brush more sand over the stones to fill the gaps. 


More sand, the stones were so irregularly shaped, it wasn't easy to get the tops even enough as to not have a trip factor.

\
Step six- my plan was to plant mosses in the cracks- make it a little green. Some moss was purchased and some was harvested in other spots in my garden.


After watering the mosses well, we called it done....until it wasn't. We had a big rainstorm and the run-off from the driveway washed out a lot of the sand. 


Wash, rinse, repeat....time to pull all stones out, put the sand in a holding area and try again.


I tried to pull the seams closer, making the spaces smaller. 


Decided to mulch between the seams, mulch being heavier than the sand.


I did save some of the mosses and replanted them.


I liked how it looked. Lots of heavy work, moving those flagstones on and off the patio area...multiple times. Aughhh


Then it rained again. Time to change course. See all the sand that washed out again? 


We used a product that will harden and form a stronger surface, Gator Dust. Did we follow all the instructions on how to do a patio? No. It started as a flagstone area that would have the stones set into the soil like you would place a pathway, cutting one stone in at a time. Our plans changed a number of times over the course of a couple months as we regrouped -- I just wanted a spot to set a chair and enjoy this part of the garden. I didn't want it perfect and uniform- just wanted a hard surface without trip factors and no stones that rocked loose when stepped upon. 


We left it as is. The stones don't move, most of the tops of the stones are even with the ones next to them and the cracks are still filled. Then we got a puppy.... who liked to pull all mosses out of the cracks. Rotten dog.

Onward to the next project. Many of you remember the dry creek bed we put in summer of 2016,  if not you can read about it here.  Well, we had a lot of these baked potato sized rocks leftover. I did another hardscape project with some and now it was time to use more. Poor planning left these rocks at the bottom of the yard. They are piled up behind a garden at the 445 feet above sea level spot in the new lot. The place I wanted to use them is up by the front door...about 468 feet above sea level. I do not have a level lot. 
So, I filled my little red wagon with enough rocks to cover the bottom and proceeded to pull the now very heavy wagon up the hill. I made this trip six times. 


The spot to fill is along the sidewalk. This is a spot where the older dog runs out the front door and stops to do his business. Nothing was growing, so it was time to do something else. Our first plan was just mulch, a semi-level spot so we didn't have too much wash out. What we do have though is a puppy. She liked my mosses, and now she has learned the fine art of digging. The mulched area was an ideal spot to use those big moose-like paws and dig. I covered the area with the potato rocks around the few stepping stones placed earlier to make getting  to the yard earlier. I think it looked pretty good. 


See the evil little dog watching me from the shade of the Magnolia tree? She likes to watch and see what I am doing in the garden, what she can undo.


I no sooner went in and she started digging again. She thinks those potato sized rocks are a good size to play with. Oh please let her grow out of this phase. I have since added twice as many rocks to this spot. She is digging less. She is now a little over a year old and getting better every day. She is an 80 lb. 15 month old German Shepherd pup. Liebling.


More projects to share soon. I feel as though much of this gardening year was redoing something Liebling had torn up. 


©Copyright 2017 Janet. All rights reserved. Content created by Janet for The Queen of Seaford. words and photos by Janet,The Queen of Seaford.

Wednesday, August 7, 2013

Hardscapes and Bizarre-scapes

Summer has settled down a little and it is time to get back to sharing my experiences while in San Francisco.  As I weeded through my 1,000 + photos, I tried to figure out how to go about posting this fabulous trip.  I felt as though I was in another land, another world almost. Some gardens were bold and bright with vivid colors, some were blues and grays foliage and dry conditions.  Some had small vistas, others were views as far as one could see.  Many of the gardens had sculpture and other hardscapes in their design.   So, the San Francisco Fling will be broken into three posts-- this one- sculptures and unusual plant material, the next one will be views and vistas, then finally all the bold colors. These are a little photo heavy, sorry if it takes a while to load.   So let us explore SF---

The bus I was on first stopped at Matt Gill's garden.  Matt Gill's Sculpture Garden.  First garden, first experience in the unusual...both plants and great sculptures caught my eye.

This garden was planted on the hillside under an overpass of the freeway.  Limited only in the space...this gardener was really thinking outside the box.  Some of the plant material was what I have as a houseplant....only 100 times the size!

I have the one below in a small pot......this one towered over my head.


This pretty little blue seed pod was planted in a lot of the gardens.  Dianella caerulea, don't you love it?  There is a variety named 'Becca' - perfect for my family garden. 

The next garden we went to was the Organic Mechanic's garden.  A courtyard in the center of tall apartment buildings....with some great planters and hardscapes.  Isn't this tire a great planter?

Many of the bloggers in my group were taking a lot of pictures of this pathway.  It is all repurposed brickwork, manhole covers, tiles and various other great finds. 


When we got to Annie's Annuals nursery I was tickled to so many pieces of garden art.  Large and small pieces, something for every garden!  Moooooo baby!

Sculptures and unusual plant material awaited us at the Wave Garden.  It was at this point I knew, I was not in my element.  I love the plants, I love the gardens, I love the hardscapes, but I had no idea what all I was looking at.   Isn't this stunning?  Here we have one of the many Mysterious California plants.  I will just embrace them for their beauty.

The bold color of succulents were at every turn.

Glorious sculptures accented spots in the garden.

The Conservatory of Flowers in the Botanical Garden had some incredible plant material.  I have seen some carnivorous plants, but never ones this large nor ones with fangs.

This fly has made a mistake hanging out here!   These carnivorous plants are in the tropical pitcher plant category-  Nepenthes.

The flooring in the Conservatory is not to be missed.   Love the whorled arrangement of the petioles.  Mysterious California plant.

Tree bark far different from what we see in the South.   This grand specimen was in the gardens at Filoli.  It is a Hinoki False Cypress Chamaecyparis obtusa, there was a tag so not a Mysterious California plant.  Hinoki False Cypress in my world is about four feet tall and bark/trunk is unseen unless you crawl into the foliage.

Even in Rebecca Sweet's lovely garden there was plant material unfamiliar and unusual.   Rebecca told me the name of this one......in one ear and out the other.  She thinks it could grow in my zone.  Hmmm..... sure is attractive.   Love the berry pink berries.  Anyone know this one?

Ok, this is a lemon tree...but it is planted in the garden!  Outside, not in a container, doesn't have to be dragged into the greenhouse or garage or house to overwinter.  How cool is that?

The most otherworldly place we visited was Ruth Bancroft Garden.  The sculptures were all over the garden, most for sale as a fund raiser.  Walk with me through the desert landscape in the 100+ degree heat as we see many many Mysterious California plants and some cool sculptures.

 To my untrained eye, the photo above has what looks like Tillandsia or Air Plants....but enormous.  Cactus and palms, aloes and other dry climate plants fill the landscape.
 Then there are the sculptures.... winged dinosaur-like creatures.

And bold colorful large shaped sculptures.

Agaves large enough to hide a small car.  These are quite mature plants.

One of the docents said some were over a hundred years old. 


My dad was a baseball fan, thought he would appreciate this one.

There were three different kinds of Eucalyptus trees in this area of the garden, this one is Ghost Gum Tree in front of a Chilean Wine Palm, Jubaea chilensis.
I enjoyed walking through this garden, appreciating the plantings with their form, size, shape, color and how the light played on each.

After the desert the garden at the Dudan home was peaceful and awesome at the same time.
I love this little setting with a water feature.

Later we arrived at the Nichols garden.  So many great plants, but so huge!!  I love the begonias...never have seen ones this big. 


Next was the garden of Keeyla Meadows.  Artwork was at every turn.  This garden was on a tiny lot but packed full of artwork and colorful plants.   


Love the arched entrance to the backyard.  You can see Keeyla at the entrance.  


I think one of my favorite sculptures in her garden was the Brugmansia flowers next to the living example.


Keeyla had sculptures in every nook -- love her use of color.

Our last stop for the Fling was Flora Grubb Gardens.  If I lived in SF I would be at Flora Grubb and Annie's Annuals at every opportunity.  Wall-hanging succulent planters were quite appealing.  Can't you see your favorite succulents plugged into these letters and hung on your outdoor wall?


Stay tuned for more of San Francisco through my eyes.

©Copyright 2013 Janet. All rights reserved. Content created by Janet for The Queen of Seaford. words and photos by Janet,The Queen of Seaford.