Sure some people are a little squeamish when it comes to live things; slippery, smooth, mysterious little live things. While we still lived in Virginia we had a speaker come to one of our Master Gardener meetings and talk about worms, vermicomposting. As her bin was filled with these little guys, she shared some with whoever was interested in starting their own composting facility. I took some home. I prepared a home for them and fed them. My Red Wigglers, or Red Snappers as my husband calls them, produced a lot of worm castings for my plants. I handed off the bin to a fellow MG when we moved, knowing I could start another quite easily.
Starting a worm bin is really easy. First you need a container to house the worms.
The Bin
A bin can be made of wood or plastic. I chose to use a standard plastic bin, opaque because the worms don't like light. They do like to breathe, so air holes are important. I used a small drill bit. Some web sites say to use 1/16 some say 1/8, I can't tell you what I used.
The holes were made on the lid and around the sides, about the top 1/3 filled with holes. My holes were not exactly lined up or counted. I may been more precise on the first bin.
Bin placement should be in a location where the temps are between 55- 75 degrees. Mine is in the storage area of the basement now, was in the laundry room in Virginia.
The Bedding
Worms need a place to live in their bins. Bedding can be various things- shredded cardboard, shredded newspaper to name a few. I use shredded newspaper. It needs to be damp, like a wrung out sponge. Worms like it moist not wet.
On top of the bedding place a cover --also moist. It keeps the worms a bit more protected.
The Worms
These are Red Worms. The Latin name is Eisenia fetida and can be ordered online through many vermicomposting website OR you can go to your local bait shop and ask for Red Worms. My husband calls them Red Snappers and used to tell the kids they were snapping worms and to be careful when you open the lid. The kids are adults and don't fall for his stories anymore, but he still shares.
The Food
Worms eat your kitchen scraps. A list of acceptible foods include lettuce, apple cores, crushed egg shell, melon rinds, carrot peelings, bread, potato skins, coffee grounds, tea bags-- in a nutshell, fruits and vegetables. Large amounts of onions and garlic or citrus are hard for the worms to handle. The grit of the egg shells help them to digest the foods.
Foods to avoid- meat and meat products, grease or oil, dairy products, plastics or tin foil (seriously!) and no pet waste.
I have found that melon rinds are cause for the worms to party! Well, not really party but they really like the melons and it disappears quickly. I cut the rind into smaller pieces just so they don't have such big pieces to break down.
Worm Reproduction
As the worms age, they become of age to reproduce. See the little band around this worm? This is an indicator of sexual maturity.
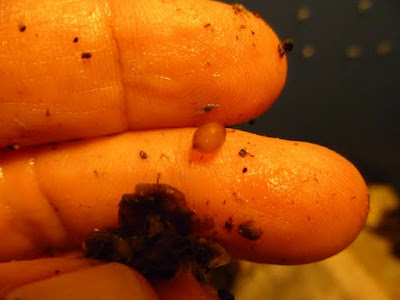
Sexually mature worms produce egg sacks. Inside these sacks are somewhere between 2- 6 baby worms. These little sacks are shaped like a lemon, small and kind of beige/yellow in color.
Knowing that the worms are increasing in number means the bin is a good environment for them and there are more to consume more food!
Harvesting the Castings
After your worms have been in their new home for about 3- 6 months you should be able to start harvesting some of the castings to use around your plants. There are a couple different ways to gather this black gold. One way is to dump all the contents on a plastic sheet and mound it in the center. Pull some of the castings to the edges and allow the worms to migrate back to the center where it is dark and 'safe', harvest the edges. After a bit of time, pull more to the edges and wait, and then harvest. Repeat until you have a small pile in the center and return this, with the worms who are hiding in there, to the bin.
Another way is to place the food in one end of the bin and harvest the other end. You may have to remove some of the worms by hand with this method.
A third method is to have a second bin. The second bin has holes in the bottom as well as the sides. Remove the lid from the first bin and stack the second one on top covering with lid. In the second bin provide new bedding and food. The worms should migrate to the top bin for food. I have not tried this method but think it may be the one I use when the bin becomes so full I have to do something.
The last method, the one I use, is to grab a handful of castings from the bin and hand pick the worms out. This is the small scale method.
Troubleshooting
There are a few problems that could occur. One I have especially when I feed the worms the melon rinds-- the bin becomes too wet. To correct this you can add bedding that is dry, mixing it into the lower region of the bin where the water is collecting. You can also ladle the liquid out, mix it with water (one site I read to add a couple Tablespoons liquid with a quart of water) and use this to water your plants.
Another issue some have is fruit flies. In the process of decomposition fruit flies are attracted to the food. Two things you can do-- one, bury the food deeper in the bin, covering it with the bedding. The other is to use some sort of fruit fly trap. One website reccommended yellow sticky tape for them to get stuck to. My method is a little Cider vinegar with a drop or two of dishsoap in a small dish on the lid of the bin.
The first problem I encountered was the worms escaping. Yes, I found many dead little worms on the floor in the morning. After being joustled around and in new digs they tend to roam. An easy solution to this is to have a small lamp or nightlight on by the bin.
More troubleshooting can be found on the links provided as well as most any extension website.

My worm bin can't handle all the composting needs of our household, so I also have two tumblers outside. I am careful not to add too much food to the worm bins, only as much as they can eat in a couple days. The tumblers also have yard debris -- I have one that is being added to, one that is 'cooking' and then I have a dump area along the wood line where it finishes breaking down. This all works for us. With our red clay soil, I view composting as a vital part of my garden.
So on this Earth Day I welcome you to visit Jan over at
Thanks For Today to read all the other Sustainable Living Ideas. She has a great list of bloggers contributing to this idea, and lots of donations for prizes.
©Copyright 2011
Janet. All rights reserved. Content created by Janet for
The Queen of Seaford.
 words and photos by Janet,The Queen of Seaford.


