Pages

Thursday, April 21, 2011

Up A River and Through the Woods

Ahhhhhh, springtime in the South.  As we drive around here, so many fields and meadows are full of Blue Cornflowers and Red Clover.  Picture perfect!

I am thinking of getting some Cornflower seeds and scattering them in our drainage field where I planted the river of Daffodils this winter.  

The other day was a beautiful day in South Carolina and so we decided to take a boat ride upriver.  As I mentioned before, we live on a lake that is fed by two rivers, the Saluda and the Reedy.  We live on the Saluda branch.  Last summer we only ventured downriver, save for a couple short trips around the bend.  After chatting with the plumber, apparently you can travel quite a way up the Saluda.  And that we did. 

In the shallows where the river takes the biggest bend there were tons of turtles sunning themselves on various logs or rocks.  Of course as we approached, they slip into the water.  I was able to get a few good shots.


We kind of felt like the African Queen, slowly exploring the wilderness.  We saw one boat early in the trip... after that ---no one. 


Oh sure, there were a few more turtles..... it was a quiet ride, in deeper than we expected water.  We kept going upstream until we came across a tree that blocked the way.  Going DOWNSTREAM was like Huck Finn on a raft.....what a current!! 
When we rounded a bend we had just past a little earlier, the cows were coming down to water.


The cows (and they are all cows to me) were lowing...getting the attention of our two passengers---


I thought one of them was going to go in~~

If we aren't out on the water, I am in the garden or in the woods, exploring.  I have found some of the best native plants in my wooded area.  While sadly looking for a place to bury a bird that hit our picture window, I found a Blue-eyed Grass, Sisyrinchium angustifolium , then another and another....right by my compost bins in the woods!


Also in my wooded area are some ferns.  I believe them to be Christmas ferns, Polystichum acrostichoides, though I thought the fronds were larger....

The little leaflets look like little boots, my way of making the ID of a Christmas fern. 


As I was looking at the ferns, trying to get a good picture I saw something else---


Yes, a native Heuchera!!  There were a number of them in this little gully.  I was not really prepared to get into the gully with my sandals..... right next to the Heuchera was----

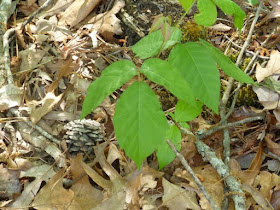
some of the biggest leafed poison ivy I have seen. 


©Copyright 2011 Janet. All rights reserved. Content created by Janet for The Queen of Seaford. words and photos by Janet,The Queen of Seaford.

Thursday, April 14, 2011

EEEWWwwwwwww Worms!

Sure some people are a little squeamish when it comes to live things; slippery, smooth, mysterious little live things.  While we still lived in Virginia we had a speaker come to one of our Master Gardener meetings and talk about worms, vermicomposting.  As her bin was filled with these little guys, she shared some with whoever was interested in starting their own composting facility.  I took some home.  I prepared a home for them and fed them.  My Red Wigglers, or Red Snappers as my husband calls them, produced a lot of worm castings for my plants.  I handed off the bin to a fellow MG when we moved, knowing I could start another quite easily.

Starting a worm bin is really easy.  First you need a container to house the worms.
The Bin 
A bin can be made of wood or plastic.  I chose to use a standard plastic bin, opaque because the worms don't like light.  They do like to breathe, so air holes are important.  I used a small drill bit.  Some web sites say to use 1/16 some say 1/8, I can't tell you what I used. 

The holes were made on the lid and around the sides, about the top 1/3 filled with holes.  My holes were not exactly lined up or counted.  I may been more precise on the first bin. 
Bin placement should be in a location where the temps are between 55- 75 degrees.  Mine is in the storage area of the basement now, was in the laundry room in Virginia.

The Bedding
Worms need a place to live in their bins.  Bedding can be various things-  shredded cardboard, shredded newspaper to name a few.  I use shredded newspaper.  It needs to be damp, like a wrung out sponge.  Worms like it moist not wet.  

On top of the bedding place a cover --also moist.  It keeps the worms a bit more protected.


The Worms

These are Red Worms.  The Latin name is Eisenia fetida and can be ordered online through many vermicomposting website OR you can go to your local bait shop and ask for Red Worms.  My husband calls them Red Snappers and used to tell the kids they were snapping worms and to be careful when you open the lid.  The kids are adults and don't fall for his stories anymore, but he still shares.


The Food

Worms eat your kitchen scraps. A list of acceptible foods include lettuce, apple cores, crushed egg shell, melon rinds, carrot peelings, bread, potato skins,  coffee grounds, tea bags-- in a nutshell, fruits and vegetables.  Large amounts of onions and garlic or citrus are hard for the worms to handle. The grit of the egg shells help them to digest the foods.
Foods to avoid- meat and meat products, grease or oil, dairy products, plastics or tin foil (seriously!) and no pet waste. 
I have found that melon rinds are cause for the worms to party!  Well, not really party but they really like the melons and it disappears quickly.   I cut the rind into smaller pieces just so they don't have such big pieces to break down.


Worm Reproduction

As the worms age, they become of age to reproduce.  See the little band around this worm?  This is an indicator of sexual maturity. 

Sexually mature worms produce egg sacks.  Inside these sacks are somewhere between 2- 6 baby worms.  These little sacks are shaped like a lemon, small and kind of beige/yellow in color.


Knowing that the worms are increasing in number means the bin is a good environment for them and there are more to consume more food!

Harvesting the Castings
After your worms have been in their new home for about 3- 6 months you should be able to start harvesting some of the castings to use around your plants.  There are a couple different ways to gather this black gold.  One way is to dump all the contents on a plastic sheet and mound it in the center.  Pull some of the castings to the edges and allow the worms to migrate back to the center where it is dark and 'safe', harvest the edges.  After a bit of time, pull more to the edges and wait, and then harvest.  Repeat until you have a small pile in the center and return this, with the worms who are hiding in there, to the bin.
Another way is to place the food in one end of the bin and harvest the other end.  You may have to remove some of the worms by hand with this method.
A third method is to have a second bin.  The second bin has holes in the bottom as well as the sides.  Remove the lid from the first bin and stack the second one on top covering with lid.  In the second bin provide new bedding and food.  The worms should migrate to the top bin for food.  I have not tried this method but think it may be the one I use when the bin becomes so full I have to do something. 
The last method, the one I use, is to grab a handful of castings from the bin and hand pick the worms out.  This is the small scale method. 

Troubleshooting
There are a few problems that could occur.  One I have especially when I feed the worms the melon rinds-- the bin becomes too wet.  To correct this you can add bedding that is dry, mixing it into the lower region of the bin where the water is collecting.  You can also ladle the liquid out, mix it with water (one site I read to add a couple Tablespoons liquid with a quart of water) and use this to water your plants. 

Another issue some have is fruit flies.  In the process of decomposition fruit flies are attracted to the food.  Two things you can do-- one, bury the food deeper in the bin, covering it with the bedding.  The other is to use some sort of fruit fly trap.  One website reccommended yellow sticky tape for them to get stuck to.  My method is a little Cider vinegar with a drop or two of dishsoap in a small dish on the lid of the bin. 

The first problem I encountered was the worms escaping.  Yes, I found many dead little worms on the floor in the morning.  After being joustled around and in new digs they tend to roam.  An easy solution to this is to have a small lamp or nightlight on by the bin. 
More troubleshooting can be found on the links provided as well as most any extension website.
 Extension sites have a publications on vermicomposting-- Clemson's, University of Maryland, to name a few and various blogging sites have great info as well -- one I like is Red Worm Composting.


My worm bin can't handle all the composting needs of our household, so I also have two tumblers outside.  I am careful not to add too much food to the worm bins, only as much as they can eat in a couple days.  The tumblers also have yard debris -- I have one that is being added to, one that is 'cooking' and then I have a dump area along the wood line where it finishes breaking down.    This all works for us.  With our red clay soil, I view composting as a vital part of my garden.
So on this Earth Day I welcome you to visit Jan over at Thanks For Today to read all the other Sustainable Living Ideas.  She has a great list of bloggers contributing to this idea, and lots of donations for prizes.


©Copyright 2011 Janet. All rights reserved. Content created by Janet for The Queen of Seaford. words and photos by Janet,The Queen of Seaford.

Tuesday, April 12, 2011

Busy Time in the Garden, Little Friends, New Plants and a Contest

This month's photo contest over at Gardening Gone Wild is once again about light.  They are looking for how the amount/direction/filter and other nuances of light affect the photo or creates the mood.  My submission is my Japanese maple 'Garnet'.  It seems to just glow.

Keeping my fingers crossed for this month's attempt.

Now on to the rest of the garden.  We had been busy through March moving rocks.  When we first moved in the backyard garden looked like this after a rainfall.

While this looks nice, you can't see the pathway except for the runoff of the rainwater downhill creating a rut in the center of the pathway.  Originally the garden beds were mulched with pinestraw and the pathway was hardwood mulch.  It created a nice definition without being too harsh.  The lower part of the garden is walled with some flat rocks and looks nice.  I think in the beginning our landscaper asked if we wanted the walls all the way around the garden.  I think I said no.  Isn't is nice a gal can change her mind? 

I have some tender plants that would benefit from not being stepped on by dog or human.  Since we had a large load of rock leftover (sitting at the bottom of the hill) we decided that this would be a good winter project.  The load of stone was left on the flat part of the yard where the elevation is probably 445-450 feet above sea level.  Where we were starting to place the stones was about 465-470.  My friend Linda and I started the hauling of the rocks in one of my large garden wagons.  You know.....they get really heavy when you are going uphill, through the mulch.   We did four loads and felt like we had made headway....until we turned and looked down the hill.  

After Linda left Charlie started bringing up the rocks in the wheelbarrow, I think about 20 or more loads, dumping them midpath.  My job was to place the rocks.  In some instances it was hard to find where the path was as the washout went straight and of course the path didn't.


From above you can see the defined pathways once again.  I had about 10 more feet of rocks to place when I took this picture.  I carried the rest by hand (it was all on the flat part of the lower yard) to finish.


So from any angle it is a nicely laid out park setting, with pathways. 


I am thinking about a bench at the intersection of the two paths. 


We all know with this garden I have lots of room to have many plants.  Last Saturday I was able to go up to to the SC Native Plant Society plant sale.  I had a list so as to not go completely crazy.  I came home with two Mountain Laurels, Kalmia latifolia 'Carol'  and 'Sarah' (or 'Carousel'-- it had two tags, either is fine), three native deciduous azaleas- Rhododendron canescens, R. arborescens, R. periclymenoides--all will find a place to become as large as they want.  I also bought a  Cephalanthus occidentalis, Buttonbush, a False indigo, Baptista, and a Silene virginica, 'Fire Pink'. 


Isn't she pretty?

I have been walking around the yard and into the woods, checking out new growth, etc.  I didn't realize I was being watched.  We have lots of these little guys, various colors and sizes.  They are fun to see.
In the area where on of the Mountain Laurel will go is my Striped Wintergreen, Chimaphila maculata, who is getting ready to bloom. 

I also found an unknown coming up.....anyone have any ideas what this is?  The red stems caught my eye. 


After the woods I checked out the front garden, the Fringe tree, Chionanthus is blooming and so are the Narcissus 'White Marvel' planted around the base.

These blooms are so white. 

Also blooming are the Deutzia gracilis 'Nikko', really pretty little blooms.


And sadly, the Pieris japonica 'Cavatine' is done for this year and starting to lose its blooms.

How is your garden shaping up?


©Copyright 2011 Janet. All rights reserved. Content created by Janet for The Queen of Seaford. words and photos by Janet,The Queen of Seaford.

Tuesday, April 5, 2011

Tuesday's Trees- River Birch, Betula nigra

I remember a number of years ago seeing a large ragged looking tree outside a garden center.  I was far from even thinking about tree postings, very young in my Master Gardener-ship.  My friend and I asked one of the people who works at this garden center what that tree was.  His response??  Yes, it was a River Birch.  No, it did not look like this one on the right.  The bark on a mature River Birch is not thin and papery and peeling.  The bark on a mature Betula nigra is dark, thick, and scaly.  He told us that most people don't realize how different the mature tree looks from the young tree.   Les?  Was that you all those years ago? 

People have a love/hate relationship with the River Birch.   This tree is a native to North America.  It is also one that many have cultivated varieties in their front yard.  I like the look of the young tree, I love the dappled light that filters through the many small leaves.  Ask someone who has a Betula in their front yard what they think of their tree.
 
This picture was taken along the edge of the lake that I live on, it is a naturally occurring tree.  The lake is fed by two rivers, now dammed, making the lake.  See all these small branches?  They are brittle and end up littering the yard, along with the leaves and in the spring-- the catkins.  This is my only negative on this pretty tree.  The name 'River Birch' comes from the location and habit of the tree.  It thrives along the water's edge.  While some of the reading I did says it does not need wet soil.  It is found along stream beds and floodplains because of the seed disbursement.  Betula nigra is one of the few early ripening seed trees.  These seeds drop early in the spring in the exposed mudflats and are carried downstream by receding high spring waters.  Seed production occurs almost every year.  All other birch produce their seeds in the fall.  Other trees that are early spring ripe seeds are Silver Maple and American Elm. 


This picture is representative of the spring's flowering of the River Birch.  I was only able to get a photo of the male catkins.  This tree is monoecious, both  male and female flowers on the same plant.  The pollen is one of the hay fever culprits.   The fruits mature as the leaves emerge.   The leaves are alternately attached, simple, oval, and double-toothed margins.  As young leaves their veins are quite noticable.  The leaves are darker on the top and lighter in color on the underside.    Their fall color is yellow to brown. 

This is the only native birch that is resistant to the Bronze Birch Borer beetle larve. 
A mature tree came be 80 feet tall in the perfect place, most commonly they are under 60 feet.  Their shape is a nice vase shaped and a rounded crown.  These trees can live 50 -75 years. 
Commercially the wood is not desirable.  Some use the River Birch for basket hoops, inexpensive furniture and turned articles.  According to the Silvics Manual they can be harvested for pulpwood with a mixture of other hardwoods.  The Silvics Manual is a wonderful reference website.  If you haven't visited this site, you should do so.  I share just the tip of the iceberg of information from this web resource.

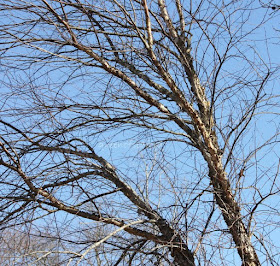
I leave you with a couple more photos of the bark, the branches, and the bright blue sky.  In the right place, this is a wonderful tree, especially if you don't worry about little branches dropping in the garden.

The decorative bark is always a nice focal interest in the winter.  I am going to take a break from the tree posts for a while.  I have to build my photo library.  When we were in Virginia I had the Learning Garden with all the trees labeled.....now I am having to learn to make those dreaded identifications with book in hand. (with the help of a patient Extension agent who thinks I spend all my time wandering in the woods. )

©Copyright 2011 Janet. All rights reserved. Content created by Janet for The Queen of Seaford. words and photos by Janet,The Queen of Seaford.